Friday, January 29, 2010

Unit 3 Preview


Unit 3 in J210 covers the Digital Darkroom; here is a preview. Above you see a before and after version of a student picture. Because the picture was taken with the flash on (I recommend most times turning off your flash), the foreground (in this case the big pot) got both washed out and spotted with a glare hot spot.

The picture, by student Kristen Beatty, has perfect composition; she’d followed the rule of threes and the rule of thirds, and she used a shallow depth of field to pop the front of the image out at the viewer as well as to create a pleasing but not distracting background. However, the glare and washed out foreground from the flash is distracting.

The second version is the photoshopped version – I spent less than five minutes enhancing her picture. I used these tools:
• The Quick Selection Tool (in the left menu bar) to selected the whole pot
• The Brightness/Contrast Tool (in the Image>Adjustments menu)
• The Spot Healing Brush (in the left menu bar)
• The Levels Tool (in the Image>Adjustments menu)

IPFW students and IU and Purdue students can get Photoshop for $20 at the book store. Be a little wary, though; Photoshop is a real memory hog, and the whole design suite takes up a ton of hard drive space. Fortunately though, you don’t have to install everything from the suite.
Unit 3 will also provide a few free and legal Photoshop clones.

Thursday, January 28, 2010

Lighting - time of day matters


This is a short video that illustrates how time of day affects both the shadows and the tone of a picture.

Sunday, January 24, 2010

A Little Trickier

This picture is a bit more tricky – I took it with a 200mm lens on a Nikon FM3 camera with T-Max film. In those days (c. 1996) this was considered a “fast” film, which means the aperture would be pretty well shut down tight, causing the back ground to be in focus. However, in this setting, the Anasazi ruins in southwestern Colorado, the light was low, and the aperture had to be opened wide, helping to blur the background. The picture is of a Native American park ranger, with ruins in the background. We had to climb a wooden ladder up a cliff and use some ancient hand holds in the rock face to get here.

Notice how the slightly out of focus background makes the portrait of the ranger "pop out" at you.

Depth of Field Made Easy

A question I get a lot is how do you achieve the shallow depth of field that pops the subject out of you with a point and shoot camera? The picture above illustrates this in its simplest answer – get close and zoom your lens to maximum telephoto. This is a picture I took in Germany in the summer of 1970.

Monday, January 18, 2010

"Deep" Depth of Field

Here’s an example of what you would call a “deep” depth of field. The foreground is very sharp, and the background is still pretty sharp, although the foreground is just a few feet from the lens and the background is a half mile or more away. This effect is captured with a “wide angle” lens and a lens “aperture” around f/16. These are all terms from J210 Unit 1.

By getting some foreground in the picture, it creates a feeling of depth and distance, almost 3D.

The picture was taken about 15 years ago in the South Dakota Badlands.

"Shallow" Depth of Field


In J210 Unit 1, you’ll hear a great deal about “depth of field.” A short definition of this term is simply the amount of image you have in focus from the “back of the image” to the “front” of the image.

I’m a big fan of a very “shallow” depth of field, which means that only a relatively small and specific part of the overall image is actually in focus, and the rest is blurry.
The blurred part of the image serves two purposes:
  1. It can be quite attractive in its own right
  2. It tends to “pop” the main point of the picture out towards the viewer.
I think you can see what I mean in the above picture that I took in Trier, Germany, about nine years ago.

Architecture pictures, particularly statues and the like can be quite boring in general, unless you work extra hard to create exactly the feeling you were looking for.

Capturing the Mind's Eye


No matter how good a camera you have, it can’t really capture what you had in your own imagination when you took the picture. Towards that end, in J210 Unit 3 we talk about the digital darkroom and how “enhancing” your pictures can bring them to a new, more vivid and vibrant level.

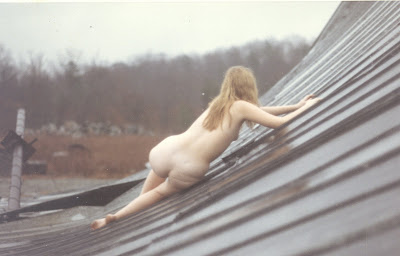
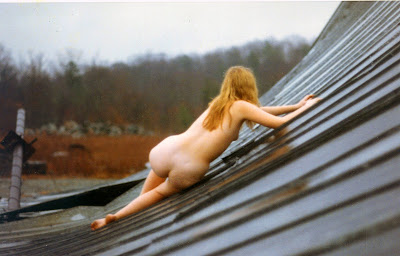
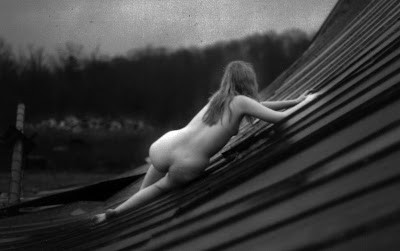
Above you will see a sequence of three images. The first is the original print from when I took the picture in 1968. The second is the enhanced version, with Photoshop. And the third version is where I let my imagination run with it a bit (I’m a big fan of black and white, when color isn’t really the point).

The picture was taken on a rainy day, when the color was quite muted anyhow. In that kind of weather and with this subject, I was really trying to capture more of a feeling than an image.