Friday, October 28, 2011

More Rainy Day Photography


I love rainy day photography. As I explained earlier, the lack of shadows and the fine mist help mute the contrasts while at the same time making each individual color stand out. Harsh sun does just the opposite, washing all the colors together into one nearly white glare. These pictures were taken this afternoon just down the road from where we live. They are shot as Raw files and opened in Adobe Bridge, where I could increase the blacks, play with the fill light and increase the vibrance. In Photoshop I played with the curves a bit in the tree trunk picture.

Monday, October 24, 2011

Framing


A composition tip that complements the rule of threes or thirds is to “frame” your picture. This can force the viewer’s eye to the dominant part of the image. In these images I tried two approaches – the top picture has a sharp background, to illustrate the dominance of the mountains over this little valley, and in the bottom image I let the frame be the sharpest point, to highlight the autumn leaves of the tree I was using to create the frame. I’m not sure which I like best.

Thursday, October 20, 2011

Shooting in “Raw” files


For those of you with high end digital cameras, if you can go into the menu and change your settings so that the digital file your camera records is a “raw” file (.NEF) instead of a jpg file, you will be greatly pleased. Although these files take up more space on your SDI card, shooting this way is well worth it. I’ll get to the reasons in a second.

On my Nikon D80, I went to the “Shooting Menu,” and for “Image quality” I scrolled over to “RAW.”

The next thing you need to do is run over to Follett and get your $30 set of discs of the complete Adobe Design Suite – this contains Photoshop, but more importantly it contains Adobe Bridge.

Once you have all this installed (you better have plenty of disc space and a big processor with lots of RAM), open Bridge and find the folder with your files. Bridge is like a “light table,” in which you can see large thumbnail views of all your images. Select an image you want to manipulate, then right click on it and tell it to open in “Camera Raw.” When you do this you see some neat tools, including “Fill Light,” “Blacks,” and “Vibrance.” Once you manipulate your picture to where you want it, tell it to “Open Image” (bottom of the Camera Raw screen), and the image will open in Photoshop, where you can resize it, save it, etc.

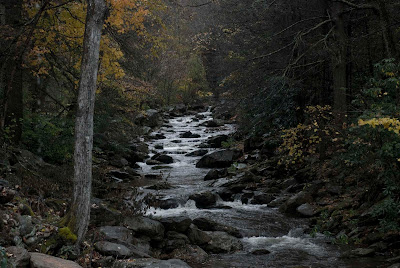
Above you see before and after pictures, in which I increased the Blacks, adjusted the fill light, and ramped up the vibrance. The final version is what I had in my “mind’s eye” as I took the original picture.

Friday, October 14, 2011

Returning to the Scene


Much like a burglar, I love to return to this scene, where I have taken many pictures over the years. I’m always looking for new light, and today I found a new view. The first view is the traditional telephonto shot showing the house and the fall color behind. I like it. The color, composition and “texture” are all pleasing. Frankly, though, this is a hard scene to mess up.

The second view, however, is my favorite, at least for now. I crouched low in the weeds this afternoon and used the house as background and texture – notice how out of focus it is. You can still see it, and it is still effective as a central subject, but the soft focus with the sharp weeds in front provide a unique look. In other words, a fresh look at an old scene can be very worthwhile.

Thursday, October 13, 2011

Rainy Day Photography


Rainy day photography can be especially fine. I still remember the days of ASA 25 Kodachrome II film, which produced slides of amazingly vibrant color. Although this was an incredibly slow ASA (now known as ISO) and thus required wide open lenses and a steady hand, a day trip in the rain always brought back spectacular results. The pictures above, taken with my little 10 megapixel Nikon point and shoot, capture these days gone by. The beauty of rain is that it softens the colors and eliminates all shadows, thus providing a wider range of tones than you find on a bright sunny day. These pictures are opened in Adobe Bridge, where I was able to intensify the blacks and the vibrancy.

Rule of thumb – the lower your ISO, the more vibrant your colors to begin with. If you can, set your ISO as low as possible to still have sharp, steady pictures. Depending on the light, your lens, and the subject matter, 100 to 200 is ideal.